SpringBoot如何使用第三方weblogic运行
1、将打包方式<packaging>改为war。
2、添加如下的一个依赖。
<dependency>
<groupId>org.springframework.boot</groupId>
<artifactId>spring-boot-starter-tomcat</artifactId>
<scope>provided</scope>
</dependency>
这个依赖的作用是将SpringBoot内部自带的tomcat排除掉,要使用外部的web容器。

1、将SpringBoot的启动类改为如下格式:
@SpringBootApplication
public class DemoApplication extends SpringBootServletInitializer implements WebApplicationInitializer {
@Override
protected SpringApplicationBuilder configure(SpringApplicationBuilder application) {
return application.sources(DemoApplication.class);
}
public static void main(String[] args) {
SpringApplication.run(DemoApplication.class, args);
}
}
其中的重点是继承了类SpringBootServletInitializer ,实现了接口WebApplicationInitializer ,并且在类里重载了configure方法。

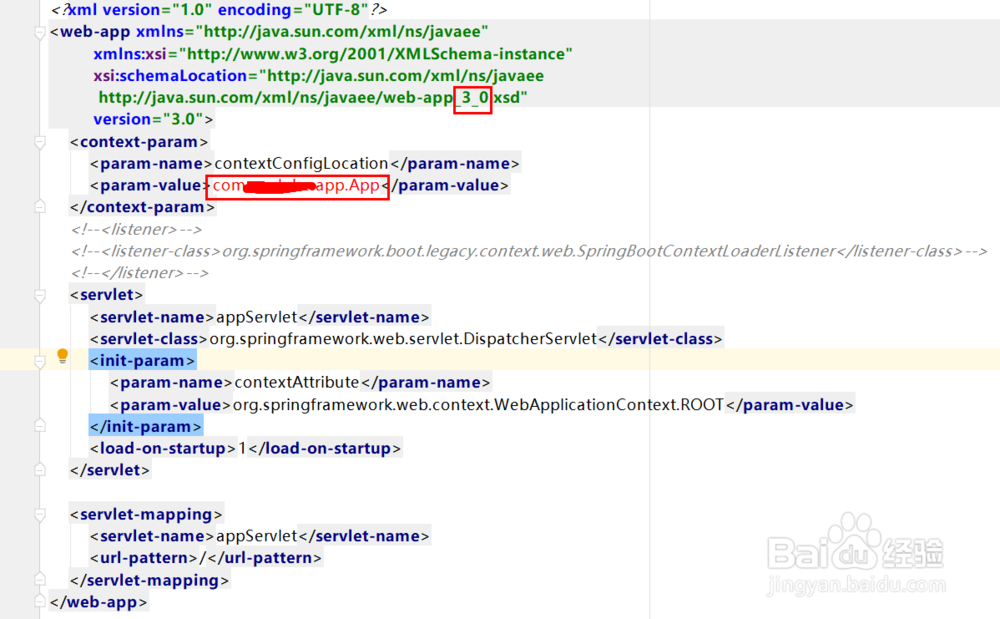
1、在SpringBoot工程导出的war包的目录WEB-INF中要添加一个web.xml文件,里面的内容如下:
<?xml version="1.0" encoding="UTF-8"?>
<web-app xmlns="http://java.sun.com/xml/ns/javaee"
xmlns:xsi="http://www.w3.org/2001/XMLSchema-instance"
xsi:schemaLocation="http://java.sun.com/xml/ns/javaee
http://java.sun.com/xml/ns/javaee/web-app_3_0.xsd"
version="3.0">
<context-param>
<param-name>contextConfigLocation</param-name>
<param-value>com.xxx.app.App</param-value>
</context-param>
<!--<listener>-->
<!--<listener-class>org.springframework.boot.legacy.context.web.SpringBootContextLoaderListener</listener-class>-->
<!--</listener>-->
<servlet>
<servlet-name>appServlet</servlet-name>
<servlet-class>org.springframework.web.servlet.DispatcherServlet</servlet-class>
<init-param>
<param-name>contextAttribute</param-name>
<param-value>org.springframework.web.context.WebApplicationContext.ROOT</param-value>
</init-param>
<load-on-startup>1</load-on-startup>
</servlet>
<servlet-mapping>
<servlet-name>appServlet</servlet-name>
<url-pattern>/</url-pattern>
</servlet-mapping>
</web-app>
其中要注意的有两个地方:一个是xsd的版本要用3_0,因为我们要用到servlet3.0。另一个就是在context-param/param-value中要配上启动类的包名全路径。
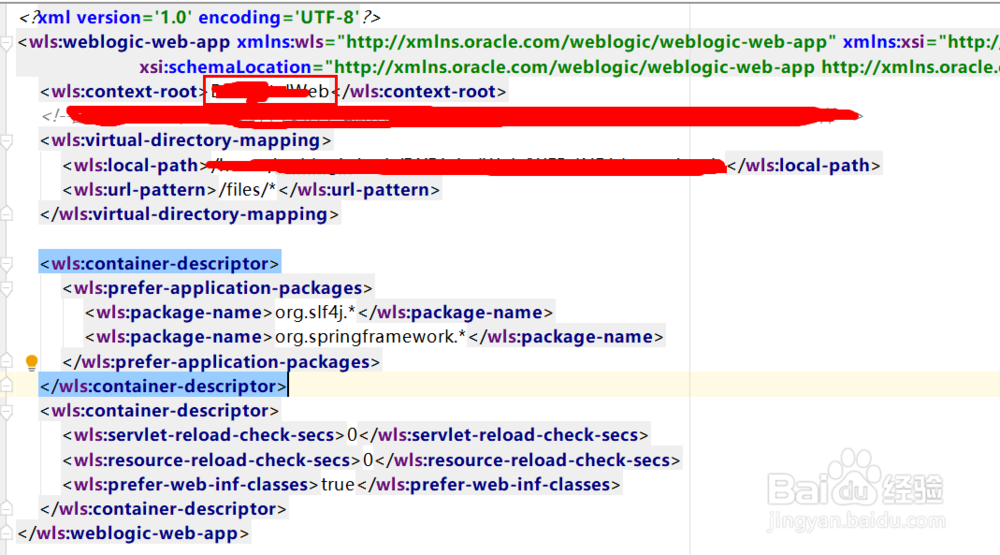
1、在SpringBoot工程导出的war包的目录WEB-INF中要添加一个weblogic.xml文件,里面的内容如下:
<?xml version='1.0' encoding='UTF-8'?>
<wls:weblogic-web-app xmlns:wls="http://xmlns.oracle.com/weblogic/weblogic-web-app" xmlns:xsi="http://www.w3.org/2001/XMLSchema-instance"
xsi:schemaLocation="http://xmlns.oracle.com/weblogic/weblogic-web-app http://xmlns.oracle.com/weblogic/weblogic-web-app/1.8/weblogic-web-app.xsd">
<wls:context-root>xxx</wls:context-root>
<wls:container-descriptor>
<wls:prefer-application-packages>
<wls:package-name>org.slf4j.*</wls:package-name>
<wls:package-name>org.springframework.*</wls:package-name>
</wls:prefer-application-packages>
</wls:container-descriptor>
<wls:container-descriptor>
<wls:servlet-reload-check-secs>0</wls:servlet-reload-check-secs>
<wls:resource-reload-check-secs>0</wls:resource-reload-check-secs>
<wls:prefer-web-inf-classes>true</wls:prefer-web-inf-classes>
</wls:container-descriptor>
</wls:weblogic-web-app>
其中,context-root配置的就是系统访问的根路径,例如系统的访问根路径是http://127.0.0.1:7001/xxx/,那么context-root就是xxx。