java用户上传的头像怎么读取
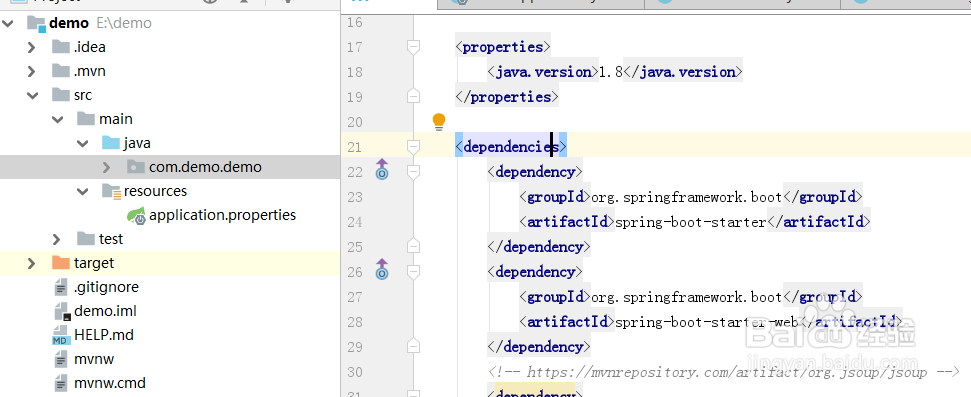
1、第一步:从start.spring.io上下载一个springboot项目,选择spring-boot-starter-web这个组件,并导入项目。
2、第二步:在项目里面写一个文件上传的controller,指定post,注意参数为@RequestParam(value = "file") MultipartFile file,代码如下:
@RestController
public class DemoController {
String filePath = "D:\\nginx\\nginx-1.13.0\\html\\";
String nginxUrl = "http://127.0.0.1:8039/";
@PostMapping("/upload")
String index(@RequestParam(value = "file") MultipartFile file){
if (file.isEmpty()) {
System.out.println("文件为空空");
}
String fileName = file.getOriginalFilename(); // 文件名
String suffixName = fileName.substring(fileName.lastIndexOf(".")); // 后缀名
fileName = UUID.randomUUID().toString().replaceAll("-", "") + suffixName; // 新文件名
File dest = new File(filePath + fileName);
if (!dest.getParentFile().exists()) {
dest.getParentFile().mkdirs();
}
try {
file.transferTo(dest);
} catch (IOException e) {
e.printStackTrace();
}
String filename = nginxUrl + fileName;
return filename;
}
}

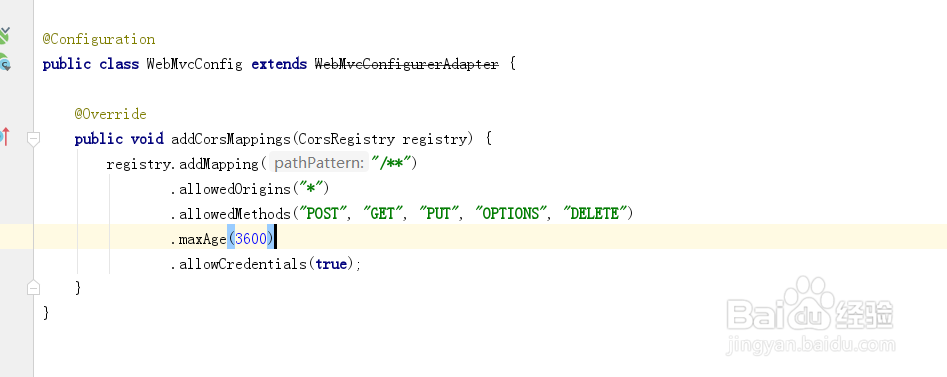
3、第三步:培训项目的跨域问题,在springboot里面配置跨域有几种方法,这里就用代码配置,代码如下:
@Configuration
public class WebMvcConfig extends WebMvcConfigurerAdapter {
@Override
public void addCorsMappings(CorsRegistry registry) {
registry.addMapping("/**")
.allowedOrigins("*")
.allowedMethods("POST", "GET", "PUT", "OPTIONS", "DELETE")
.maxAge(3600)
.allowCredentials(true);
}
}
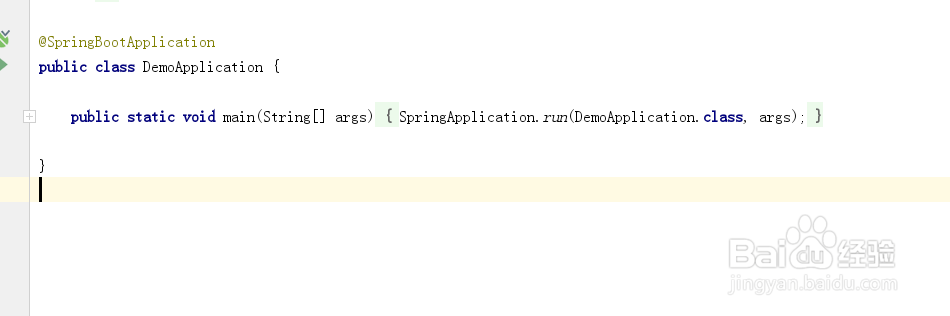
4、第四步:开始启动项目,在springboot里面是通过main方法启动,主类需要配置@SpringBootApplication注解,代码如下:
@SpringBootApplication
public class DemoApplication {
public static void main(String[] args) {
SpringApplication.run(DemoApplication.class, args);
}
}
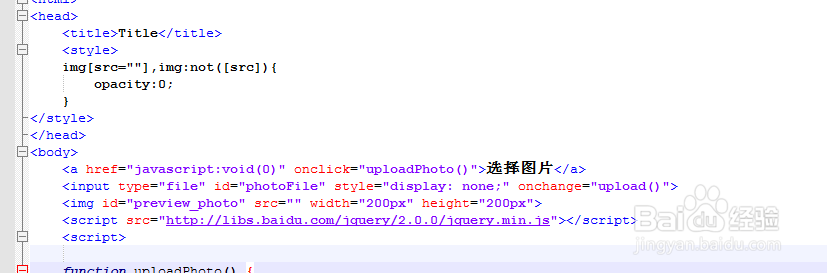
5、第五步:编写前端上传代码,这里使用的上前后分离的方式,采用异步ajax上传,html代码如下:
<a href="javascript:void(0)" onclick="uploadPhoto()">选择图片</a>
<input type="file" id="photoFile" style="display: none;" onchange="upload()">
<img id="preview_photo" src="
<script src="http://libs.baidu.com/jquery/2.0.0/jquery.min.js"></script>
6、第六步:编写js部分代码,代码如下:
<script>
function uploadPhoto() {
$("#photoFile").click();
}
/**
* 上传图片
*/
function upload() {
if ($("#photoFile").val() == '') {
return;
}
var formData = new FormData();
formData.append('file', document.getElementById('photoFile').files[0]);
$.ajax({
url:"http://127.0.0.1:8080/upload",
type:"post",
data: formData,
contentType: false,
processData: false,
success: function(data) {
$("#preview_photo").attr("src", data);
},
error:function(data) {
alert("上传失败")
}
});
}
</script>
7、第七步:开始上传,上传路径在配置的filePath下面,返回的就是url地址,前端用的ngin,效果如下
