树莓派ngrok内网渗透(无公网IP)
1、购买香港或国外的vps,我用的是openvzcc的服务器,包年费用大概70元左右,当然性能网速好的较贵点。有了VPS相当于你在境外有了自己的服务器(一台运行着linux的电脑), 也就是有了自己独立的一个固定IP。你可以直接ssh此IP, 以便于管理自己的服务器。

2、有了自己的VPS后要做的事就是ssh上这台server(不懂请自行度之)。

3、下面要做的事情是在vps上编译服务端(运行在vps上)和客户端(运行在树莓派上)。需要说明的是我这里的vps装的是centos 32位的系统。需要准备的环境为:git安装 , go语言安装, ngrok源码下载和配置
4、git安装:
下载:
wget http://mirrors.ustc.edu.cn/kernel.org/software/scm/git/git-2.9.3.tar.gz
解压:
tar zxvf git-2.9.3.tar.gz
编译:
cd git-2.9.3
./configure --prefix=/usr/local/git-2.9.3
make
make install
移除低版本git:
yum remove git*
ln -s /usr/local/git-2.9.3/bin/* /usr/bin/
检查git版本:
git --version

5、go语言安装:
安装必要包:
yum -y install zlib-devel openssl-devel perl hg cpio expat-devel gettext-devel curl curl-devel perl-ExtUtils-MakeMaker hg wget gcc gcc-c++ build-essential mercurial
下载配置go源码:
wget http://www.golangtc.com/static/go/1.7rc6/go1.7rc6.linux-386.tar.gz
tar -zxvf go1.7.6.linux-386.tar.gz
mv go /usr/local/
ln -s /usr/local/go/bin/* /usr/bin/
检查go版本:
go env
6、ngrok源码下载和配置:
下载 :
wget https://coding.net/u/sfantree/p/self_use_OSS/git/raw/master/ngrok/ngrok.zip
unzip ngrok.zip
export GOPATH=~/ngrok/
export NGROK_DOMAIN="tangwei.vicp.net"
cd ~/ngrok
生成证书,Ngrok会使用此证书加密通讯:
openssl genrsa -out base.key 2048
openssl req -new -x509 -nodes -key base.key -days 10000 -subj "/CN=$NGROK_DOMAIN" -out rootCA.pem
openssl genrsa -out server.key 2048
openssl req -new -key server.key -subj "/CN=$NGROK_DOMAIN" -out server.csr
openssl x509 -req -in server.csr -CA rootCA.pem -CAkey base.key -CAcreateserial -days 10000 -out server.crt
将证书文件复制到指定位置:
cp rootCA.pem assets/client/tls/ngrokroot.crt -i
cp server.crt assets/server/tls/snakeoil.crt -i
cp server.key assets/server/tls/snakeoil.key -i

7、编译服务器端与客户端:
服务端(linux-x86-64)编译:
export GOOS=linux
export GOARCH=386
make release-server
客户端编译:
export GOOS=linux
export GOARCH=arm
make release-client


8、部署Ngrok:
绑定域名:
把tangwei.vicp.net解析到vps的IP
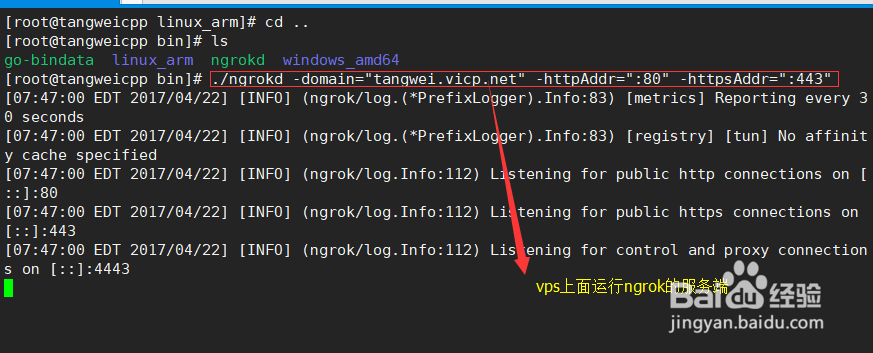
服务器端部署:(vps上运行)
cp ~/ngrok/bin/ngrokd /usr/bin/
运行:
./ngrokd -domain="tangwei.vicp.net" -httpAddr=":80" -httpsAddr=":443"
客户端部署:(下载到树莓派下面运行)
将~/ngrok/bin/linux_arm/ngrok下载到树莓派下,方法可以用winscp(自行百度)
新建配置文件:
mkdir ~/ngrok/ && cd ~/ngrok/
touch ~/ngrok/ngrok.cfg
ngrok.cfg填入以下内容:(tcp和http)
server_addr: ngrok.sfantree.com:4443
trust_host_root_certs: false
tunnels:
http:
proto:
http: 80
subdomain: pi
ssh:
remote_port: 10086
proto:
tcp: 22
运行:
./ngrok -config=ngrok.cfg start http ssh