springboot项目(四)安装Redis并使用
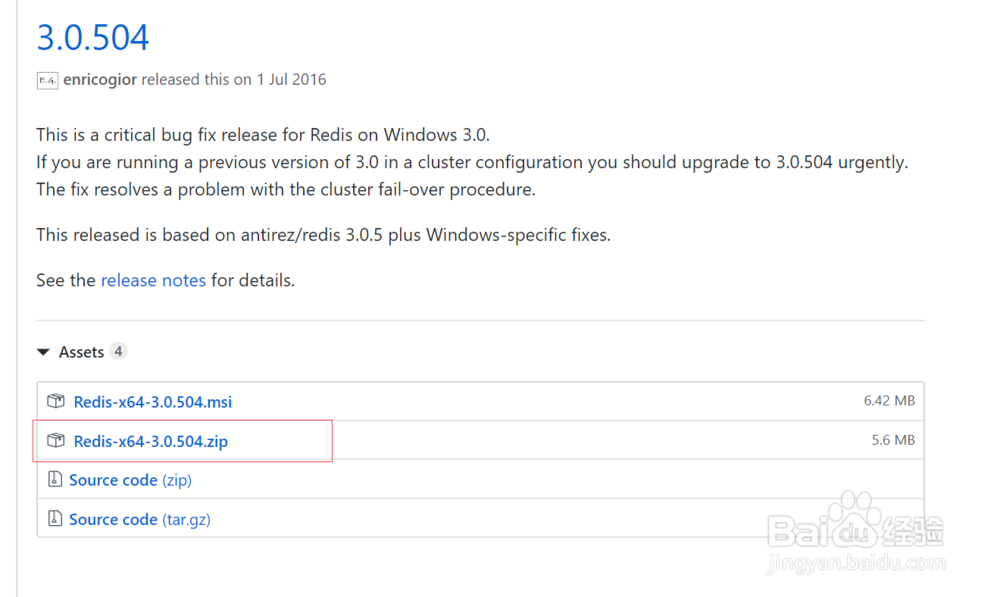
1、首先先下载免安装的绿色压缩包,地址是:https://github.com/MSOpenTech/redis/releases。下图红圈中的就是面安装的压缩包了。
2、解压之后文件目录如下:

3、双击redis-server.exe启动,启动后的界面如下图所示

4、注意点:当Redis后界面不能关闭,如果关闭了,Redis也就关闭了。所以有另外一种方式启动,就是变成服务。
就是在环境变量的系统变量Path中添加解压后的路径,然后打开cmd.exe界面输入redis-server.exe --service-install redis.windows.conf --loglevel verbose就能变成服务了。

1、现在我们继续在springboot项目(三)的基础上,再进行集成Redis。
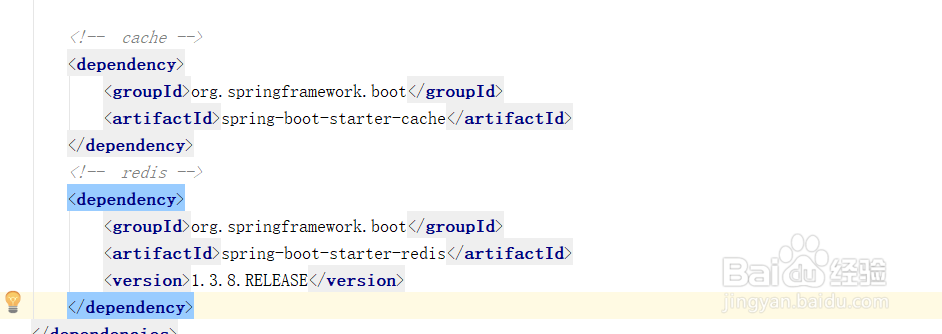
2、pom.xml引入Redis相关jar包,配置为:
<!-- cache -->
<dependency>
<groupId>org.springframework.boot</groupId>
<artifactId>spring-boot-starter-cache</artifactId>
</dependency>
<!-- redis -->
<dependency>
<groupId>org.springframework.boot</groupId>
<artifactId>spring-boot-starter-redis</artifactId>
<version>1.3.8.RELEASE</version>
</dependency>
3、在application.yml配置文件中配置Redis相关的链接端口等信息,配置如下:
#Redis配置
redis:
host: 127.0.0.1 #edis服务器IP
port: 6379 # Redis服务器连接端口
password: # 连接密码(默认为空)
pool:
max-active: 12 # 连接池最大连接数
max-wait: -1 # 连接池最大阻塞
max-idle: 12 # 连接池中的最大空闲连接
min-idle: 2 # 连接池中的最小空闲连接
timeout: 0 # 连接超时时间

4、编写Redis缓存服务,代码如下:
import org.springframework.data.redis.core.RedisTemplate;
import org.springframework.stereotype.Service;
import javax.annotation.Resource;
import java.util.concurrent.TimeUnit;
/**
* Redis缓存服务
* Created by 30721 on 2019/7/7.
*/
@Service
public class RedisCacheService {
@Resource
private RedisTemplate<String, Object> redisTemplate;
/**
* 写入缓存(不设置时间)
* @param key
* @param value
* @return
*/
public boolean set(final String key, Object value) {
boolean result = false;
try {
redisTemplate.opsForValue().set(key, value);
result = true;
} catch (Exception e) {
e.printStackTrace();
}
return result;
}
/**
* 写入缓存(设置时效(秒))
* @param key
* @param value
* @param expireTime 秒为单位
* @return
*/
public boolean set(final String key, Object value, Long expireTime) {
boolean result = false;
try {
if(set(key, value)) {
redisTemplate.expire(key, expireTime, TimeUnit.SECONDS);
result = true;
}
} catch (Exception e) {
e.printStackTrace();
}
return result;
}
/**
* 读取缓存
* @param key
* @return
*/
public Object get(final String key) {
return redisTemplate.opsForValue().get(key);
}
/**
* 更新缓存
*/
public boolean getAndSet(final String key, String value) {
boolean result = false;
try {
redisTemplate.opsForValue().getAndSet(key, value);
result = true;
} catch (Exception e) {
e.printStackTrace();
}
return result;
}
/**
* 删除缓存
*/
public boolean delete(final String key) {
boolean result = false;
try {
redisTemplate.delete(key);
result = true;
} catch (Exception e) {
e.printStackTrace();
}
return result;
}
}

1、测试代码如下:
import org.junit.Test;
import org.junit.runner.RunWith;
import org.springframework.beans.factory.annotation.Autowired;
import org.springframework.boot.test.context.SpringBootTest;
import org.springframework.test.context.junit4.SpringRunner;
/**
* Created by 30721 on 2019/7/7.
*/
@RunWith(SpringRunner.class)
@SpringBootTest
public class RedisTest {
@Autowired
private RedisCacheService redisCacheService;
@Test
public void test() {
String key = "key1";
//测试数据添加和获取
redisCacheService.set(key, "hello");
System.out.println(redisCacheService.get(key));
//删除key
redisCacheService.delete(key);
System.out.println(redisCacheService.get(key));
//设置时间
redisCacheService.set(key, "HELLO WORLD", 2L);
System.out.println(redisCacheService.get(key));
try {
Thread.sleep(2000L);//休眠2秒
} catch (InterruptedException e) {
e.printStackTrace();
}
System.out.println(redisCacheService.get(key));
}
}

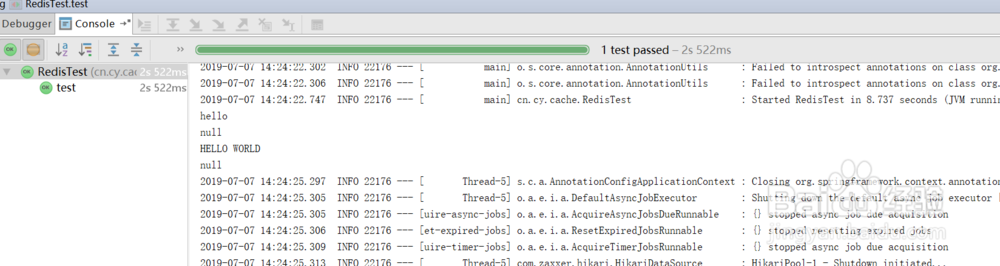
2、测试结果是:
hello
null
HELLO WORLD
null
如下图:
声明:本网站引用、摘录或转载内容仅供网站访问者交流或参考,不代表本站立场,如存在版权或非法内容,请联系站长删除,联系邮箱:site.kefu@qq.com。
阅读量:158
阅读量:65
阅读量:112
阅读量:99
阅读量:117