手机PC远程控制开关方法
1、首先要注册新用户,注册完之后点击“用户中心”进入管理界面

2、添加新设备
在我的设备中选择"添加新设备"

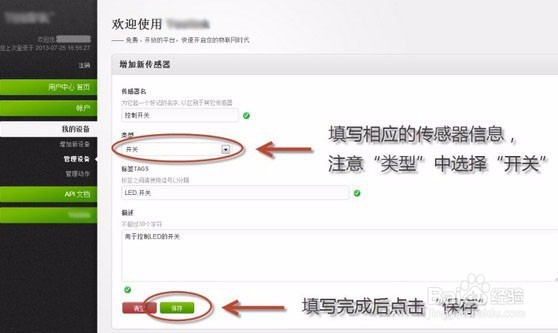
3、信息填写
填写相应的传感器信息,注意“类型”中选择为“开关”
填写完成后点击“保存”按钮
1、设备添加完成后我们需要添加新的传感器
1、新建一个名为"LED开关"的设备
2、我们为这个设备添加名为“控制开关”的开关类型传感器

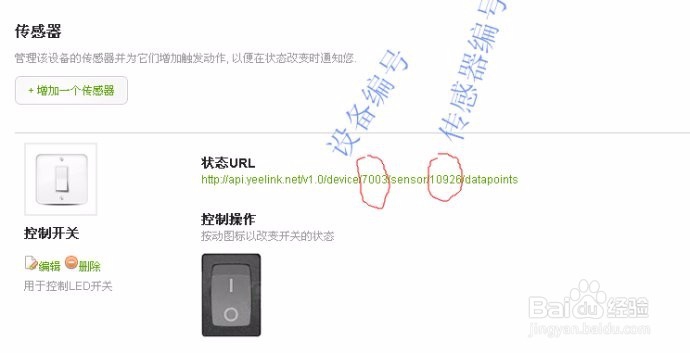
2、传感器信息
在开关传感器中我们可以看到传感器的一些信息,如图所示:
前面红圈内代表设备编号、后面代表的是传感器编号
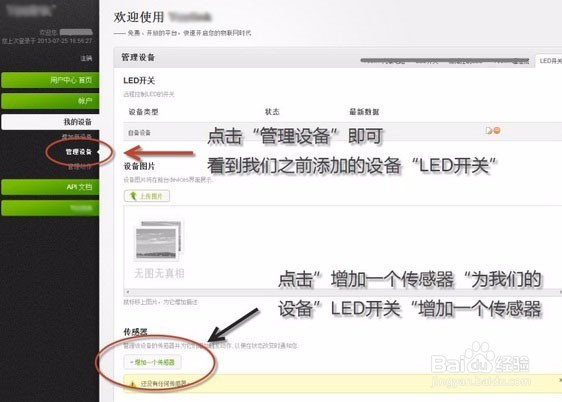
3、添加传感器
点击“我的设备”中的“管理设备”即可,然后在传感器页面点击“增加一个传感器”
1、接下去我们要往DCCduino上传代码
#include#include#include#include
byte buff[2];
// for yeelink api#define APIKEY "xxxxxxxxxxxxxxxxxxxx" // 此处替换为你自己的API KEY#define DEVICEID 7003 // 此处替换为你的设备编号#define SENSORID1 10926 // 此处替换为你的传感器编号
// assign a MAC address for the ethernet controller.byte mac[] = { 0x00, 0x1D, 0x72, 0x82, 0x35, 0x9D};// initialize the library instance:EthernetClient client ;char server[] = "api.yeelink.net"; // name address for yeelink API
unsigned long lastConnectionTime = 0; // last time you connected to the server, in millisecondsboolean lastConnected = false; // state of the connection last time through the main loopconst unsigned long postingInterval = 3*1000; // delay between 2 datapoints, 30sString returnValue = "";boolean ResponseBegin = false;
void setup() { pinMode(5, OUTPUT); Wire.begin(); // start serial port: Serial.begin(57600); // start the Ethernet connection with DHCP: if (Ethernet.begin(mac) == 0) { Serial.println("Failed to configure Ethernet using DHCP"); for(;;) ; } else { Serial.println("Ethernet configuration OK"); }}
void loop() { // if there's incoming data from the net connection. // send it out the serial port. This is for debugging // purposes only:
if (client.available()) { char c = client.read(); // Serial.print(c); if (c == '{') ResponseBegin = true; else if (c == '}') ResponseBegin = false;
if (ResponseBegin) returnValue += c; } if (returnValue.length() !=0 && (ResponseBegin == false)) { Serial.println(returnValue); if (returnValue.charAt(returnValue.length() - 1) == '1') { Serial.println("turn on the LED"); digitalWrite(5, HIGH); } else if(returnValue.charAt(returnValue.length() - 1) == '0') { Serial.println("turn off the LED"); digitalWrite(5, LOW); } returnValue = ""; } // if there's no net connection, but there was one last time // through the loop, then stop the client: if (!client.connected() && lastConnected) { Serial.println(); Serial.println("disconnecting."); client.stop(); } // if you're not connected, and ten seconds have passed since // your last connection, then connect again and send data: if(!client.connected() && (millis() - lastConnectionTime > postingInterval)) { // read sensor data, replace with your code //int sensorReading = readLightSensor(); Serial.print("yeelink:"); //get data from server getData(); } // store the state of the connection for next time through // the loop: lastConnected = client.connected();}
// this method makes a HTTP connection to the server and get data backvoid getData(void) { // if there's a successful connection: if (client.connect(server, 80)) { Serial.println("connecting..."); // send the HTTP GET request: client.print("GET /v1.0/device/"); client.print(DEVICEID); client.print("/sensor/"); client.print(SENSORID1); client.print("/datapoints"); client.println(" HTTP/1.1"); client.println("Host: api.yeelink.net"); client.print("Accept: *"); client.print("/"); client.println("*"); client.print("U-ApiKey: "); client.println(APIKEY); client.println("Content-Length: 0"); client.println("Connection: close"); client.println(); Serial.println("print get done."); } else { // if you couldn't make a connection: Serial.println("connection failed"); Serial.println(); Serial.println("disconnecting."); client.stop(); } // note the time that the connection was made or attempted: lastConnectionTime = millis();}
2、设备接线
如图接线,前提是保证你的网线是链接到路由器上面能上网的,LED的端口链接到数字端口5脚,按照设想我们是在PC端或者手机APP远程控制这个LED,好了,切换我们的设备管理器,控制我们的开关:

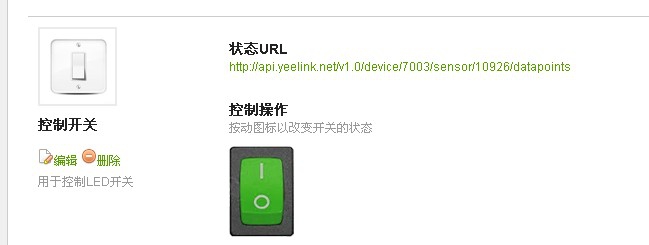
3、接线完成后,点击页面中的控制开关界面,点击"控制操作"按钮变为"打开"状态,能够看到设备灯亮起,代表设备受控成功

4、再转化到我们的手机APP,打开应用,找到你的设备进行操作