android TabWidget
1、首先,新建一个android项目叫做TbHostShow,其他参数可以自己设定,之后点击完成,得到结果图如下:


2、在开发之前,我们要首先了解,TabHost是整个Tab的容器,包括两部分,TabWidget和FrameLayout。TabWidget就是每个tab的标签,FrameLayout则是tab内容。接着我们开始初始化main.xml。
首先声明TabHost,包含TabWidget,FrameLayout元素。
<TabHost
android:id="@android:id/tabhost" //声明控件ID
android:layout_width="fill_parent" //控件宽度与父控件一致
android:layout_height="fill_parent"> //控件高度与父控件一致
声明TabWidget,tab标签页
<TabWidget
android:layout_width="fill_parent" //控件宽度与父控件一致
android:layout_height="wrap_content" //控件高度与自身适应
android:id="@android:id/tabs"> //声明控件ID
声明FrameLayout,tab页里的内容信息
<FrameLayout
android:layout_width="fill_parent" //控件宽度与父控件一致
android:layout_height="wrap_content" //控件高度与自身适应
android:id="@android:id/tabcontent"> //声明控件ID
注意下:
如果我们使用extends TabAcitivty,如同ListActivity,TabHost必须设置为@android:id/tabhost TabWidget必须设置android:id为@android:id/tabs FrameLayout需要设置android:id为@android:id/tabcontent


3、声明FrameLayout里面的内容信息
第一个界面内容:声明一个线性布局,声明一个TextView,展示内容这是TAB 1
<LinearLayout android:layout_width="fill_parent"
android:layout_height="fill_parent"
android:id="@+id/tab1">
<TextView android:id="@+id/TextView2"
android:layout_width="fill_parent"
android:layout_height="wrap_content"
android:text="这是TAB 1">
</TextView>
</LinearLayout>

4、第二个界面内容,声明了一个闹钟控件
<LinearLayout
android:layout_width="fill_parent"
android:layout_height="fill_parent"
android:id="@+id/tab2">
<AnalogClock android:id="@+id/analogclock1"
android:layout_width="fill_parent" android:layout_height="wrap_content"
></AnalogClock>
</LinearLayout>

5、第三个界面,声明一个展示框,内容显示这是TAB 3,文本编辑控件
<LinearLayout android:layout_width="fill_parent" android:layout_height="fill_parent"
android:id="@+id/tab3">
<TextView android:id="@+id/TextView3"
android:layout_width="wrap_content" android:layout_height="wrap_content"
android:text="这是TAB 3"></TextView>
</LinearLayout>

1、添加主体的方法函数,将public class TbHostView extends Activity 修改为public class TbHostView extends TabActivity ,首先是实例化TabHost,然后向TabHost中添加tab页

2、//添加几个Tab
mTabHost.addTab(
//标签页名称为Tab_test1
mTabHost.newTabSpec("Tab_test1").
//指定图片来源,
setIndicator("TAB1",getResources().
//图片ID
getDrawable(android.R.drawable.ic_btn_speak_now)).
//添加LinearLayout ID为tab1的界面
setContent(R.id.tab1));
//添加几个Tab
mTabHost.addTab(
//标签页名称为Tab_test2
mTabHost.newTabSpec("tab_text2").
//指定图片来源,
setIndicator("TAB2",getResources().
//图片ID
getDrawable(android.R.drawable.ic_menu_add)).
//添加LinearLayout ID为tab2的界面
setContent(R.id.tab2));
mTabHost.addTab(mTabHost.
//标签页名称为Tab_test3
newTabSpec("tab_test3").
//指定图片来源,图片ID 添加LinearLayout ID为tab2的界面
setIndicator(
"TAB3",getResources().getDrawable(android.R.drawable.ic_menu_camera))
.setContent(R.id.tab3));


3、 //设置背景
mTabHost.setBackgroundColor(Color.argb(150,22,70,153));
//默认展示第一个tab页
mTabHost.setCurrentTab(0);
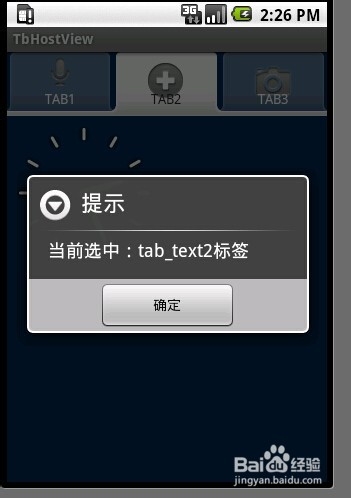
//处理tab页 切换时触发的事件,这里展示一个提示框
mTabHost.setOnTabChangedListener(new OnTabChangeListener(){
@Override
public void onTabChanged(String tabId) {
// TODO Auto-generated method stub
Dialog dialog = new AlertDialog.Builder(TbHostView.this)
.setTitle("提示")
.setMessage("当前选中:"+tabId+"标签")
.setPositiveButton("确定",
new DialogInterface.OnClickListener()
{
public void onClick(DialogInterface dialog, int whichButton)
{
dialog.cancel();
}
}).create();//创建按钮
dialog.show();
}
});

1、程序运行结果展示,