centos7.2下greenplum-db的安装和配置
1、1.1.系统版本要求:
根据官方文档: greenplum-db支持以下几种linux系统:
SUSE Linux Enterprise Server 64-bit 12 SP2 or SP3, with kernel 4.4.73-5.1 or newer SUSE Linux Enterprise Server 64-bit 11 SP4
CentOS 64-bit 6.x or 7.x
Red Hat Enterprise Linux (RHEL) 64-bit 6.x or 7.x
作者的操作系统版本如下:

2、1.2.文件系统要求:
数据存储目录为xfs文件系统
作者安装的系统格式如下:

1、2.1 gp服务器列表
192.168.7.212 yanfa1 主节点
192.168.7.218 yanfa11 数据节点1
192.168.7.216 yanfa2 数据节点2
192.168.7.221 yanfa21 主节点切换备份节点
2、2.2.修改系统配置项
关闭SELINUX
vi /etc/selinux/config
SELINUX=disabled
3、2.3关闭防火墙
systemctl status firewalld
systemctl stop firewalld.service
systemctl disable firewalld.service
iptable -L -n
4、2.4修改内核配置参数,并执行 sysctl -p使之生效
vi /etc/sysctl.conf
kernel.shmmax = 500000000
kernel.shmmni = 4096
kernel.shmall = 4000000000
kernel.sem = 2000 4096000 2000 2048
kernel.sysrq = 1
kernel.core_uses_pid = 1
kernel.msgmnb = 65536
kernel.msgmax = 65536
kernel.msgmni = 2048
net.ipv4.tcp_syncookies = 1
net.ipv4.ip_forward = 0
net.ipv4.conf.default.accept_source_route = 0
net.ipv4.tcp_tw_recycle = 1
net.ipv4.tcp_max_syn_backlog = 4096
net.ipv4.conf.all.arp_filter = 1
net.ipv4.ip_local_port_range = 1025 65535
net.core.netdev_max_backlog = 10000
net.core.rmem_max = 2097152
net.core.wmem_max = 2097152
vm.overcommit_memory = 2
5、vi /etc/security/limits.conf
* soft nofile 65536
* hard nofile 65536
* soft nproc 131072
* hard nproc 131072
6、2.5配置集群中各节点hosts信息
vi /etc/hosts
192.168.7.212 yanfa1
192.168.7.218 yanfa11
192.168.7.216 yanfa2
192.168.7.221 yanfa21

1、3.1从greenplum官网下载以下2个包到/opt目录下
greenplum-db-5.4.0-rhel7-x86_64.zip
greenplum-cc-web-3.3.1-LINUX-x86_64.zip
执行
unzip greenplum-db-5.4.0-rhel7-x86_64.zip
unzip greenplum-cc-web-3.3.1-LINUX-x86_64.zip
解压后分别为
greenplum-db-5.4.0-rhel7-x86_64.bin
greenplum-cc-web-3.3.1-LINUX-x86_64.bin
2、3.2 开始安装
执行
./greenplum-db-5.4.0-rhel7-x86_64.bin
按照提示输入安装目录
/opt/greenplum-db
执行
./greenplum-cc-web-3.3.1-LINUX-x86_64.bin
按照提示输入安装目录
/opt/greenplum-cc-web
3、解压完成后以root身份创建gpadmin用户和组,用来管理greenplum-db
groupadd gpadmin # 创建分组
useradd gpadmin -g gpadmin # 创建用户并分配组
passwd gpadmin # 为gpadmin分配密码
cd /opt/greenplum-db
chown -R gpadmin:gpadmin greenplum-db/
chown -R gpadmin:gpadmin greenplum-cc-web/

4、3.3切换到gpadmin用户下
su - gpadmin
mkdir -p /opt/greenplum-db/gpconfigs
cd /opt/greenplum-db/gpconfigs
创建配置文件
vim hostfile_exkeys
输入
yanfa2
yanfa1
yanfa11
yanfa21
vi hostfile
yanfa1
yanfa11
yanfa21

5、 在gpadmin和root用户下添加环境变量
vi ~/.bashrc
#添加以下内容
export LD_LIBRARY_PATH=$GPHOME/lib
export MASTER_DATA_DIRECTORY=/home/gpadmin/gpdata/master/gpseg-1
source /opt/greenplum-db/greenplum_path.sh
source /opt/greenplum-cc-web/gpcc_path.sh
保存退出,执行下面语句使其生效
source ~/.bashrc
6、切换到root用户:
gpssh-exkeys -f /opt/greenplum-db/gpconfigs/hostfile_exkeys
#拷贝mster节点公钥至各segment节点
gpseginstall -f /opt/greenplum-db/gpconfigs/hostfile_exkeys -p gpadmin
说明
gpssh-exkeys -f hostfile_exkeys将会在master节点生成公私钥,并拷贝至hostfile_exkeys各segment节点,实现后续无密钥登陆gpseginstall -f /opt/greenplum-db/gpconfigs/hostfile_exkeys -p gpadmin使用默认用户名(gpadmin) 密码:gpadmin 在各segment节点安装Greenplum-db
7、3.4在master及各segment节点创建数据存储目录
mkdir /home/gpadmin/gpdata/master
cd /home/gpadmin/
chown -R gpadmin:gpadmin gpdata/master
gpssh -f /opt/greenplum-db/gpconfigs/hostfile -e "mkdir -p /home/gpadmin/gpdata/data1/primary;mkdir -p /home/gpadmin/gpdata/data2/primary”
gpssh -f /opt/greenplum-db/gpconfigs/hostfile -e "mkdir -p /home/gpadmin/gpdata/data1/mirror;mkdir -p /home/gpadmin/gpdata/data2/mirror"
gpssh -f /opt/greenplum-db/gpconfigs/hostfile -e "chown -R gpadmin:gpadmin /home/gpadmin/gpdata"
gpssh -f /opt/greenplum-db/gpconfigs/hostfile_exkeys -v -e 'ntpd'
切换到gpadmin用户下,初始化数据库集群
su - gpadmin
cd /opt/greenplum-db/
cp /opt/greenplum-db/docs/cli_help/gpconfigs/gpinitsystem_config /opt/greenplum-db/gpconfigs/gpinitsystem_config
vi /opt/greenplum-db/gpconfigs/gpinitsystem_config
###修改以下内容
MASTER_HOSTNAME=mdw
PORT_BASE=40000
declare -a DATA_DIRECTORY=(/home/gpadmin/gpdata/data1/primary /home/gpadmin/gpdata/data1/primary /home/gpadmin/gpdata/data2/primary /home/gpadmin/gpdata/data2/primary)
MASTER_DIRECTORY=/home/gpadmin/gpdata/master
MASTER_PORT=5432
MIRROR_PORT_BASE=50000
REPLICATION_PORT_BASE=41000
MIRROR_REPLICATION_PORT_BASE=51000
declare -a MIRROR_DATA_DIRECTORY=(/home/gpadmin/gpdata/data1/mirror /home/gpadmin/gpdata/data1/mirror /home/gpadmin/gpdata/data2/mirror /home/gpadmin/gpdata/data2/mirror)
DATABASE_NAME=gpdb
MACHINE_LIST_FILE=/opt/greenplum-db/gpconfigs/hostfile
8、3.5配置修改完成之后,执行以下命令初始化数据库
gpinitsystem -c /opt/greenplum-db/gpconfigs/gpinitsystem_config -h /opt/greenplum-db/gpconfigs/hostfile
出现下面的日志表示安装成功:

9、3.6 psql修改数据库密码:
psql -d gpdb
gpdb=# alter user gpadmin with password 'gpadmin'
gpdb=# \q
然后,重启greenplumdb集群
gpstop -a
gpstart -a
上述gpdb已安装完成,下面安装gpcc
10、3.7.启动greenplum-db commond center(gpcc)
gpperfmon_install --enable --port 5432 --password gpadmin
重启greenplumdb集群,加载gpperfmon_install采集数据
gpstop -a
gpstart -a
启动web控制台界面
gpcmdr --setup
按照提示输入实例名、监听端口信息等
#Please enter the instance name
gpcc
#Press ENTER to use instance name
gpcc
#Is the master host for the Greenplum Database remote? Yy/Nn (default=N)
N
#What port does the Greenplum Database use? (default=5432)
5432
#Enable kerberos login for this instance? Yy/Nn (default=N)
N
#What port would you like the new web server to use for this instance? (default=28080)
28080
启动、停止
gpcmdr --start #启动
gpcmdr --stop #停止
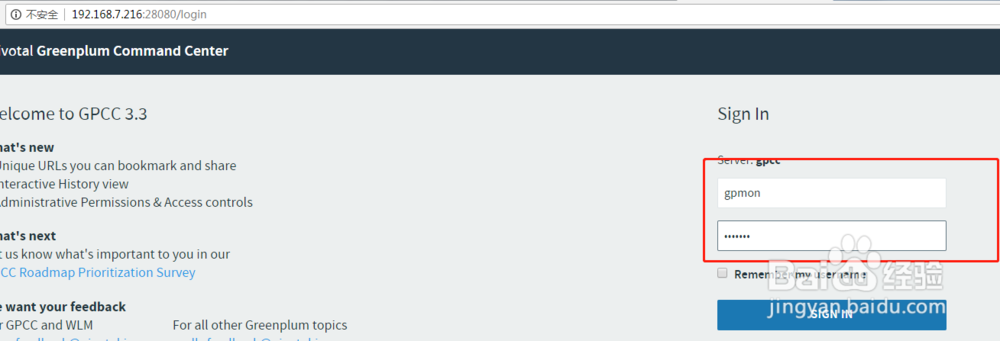
11、3.8.web登录gpcc控制台
http://master:28080/
输入用户名和密码:gpmon/gpadmin
12、如果密码不对,请修改gpadmin用户目录下文件.pgpass
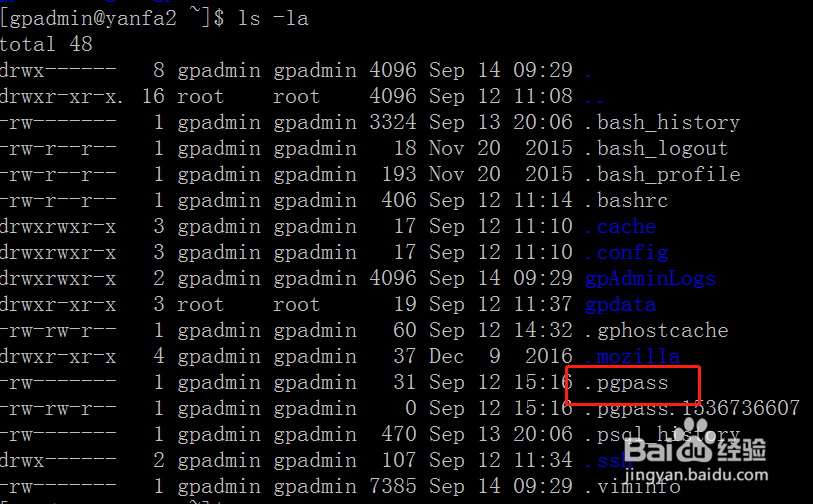
13、文件内容为:*:5432:gpperfmon:gpmon:gpadmin
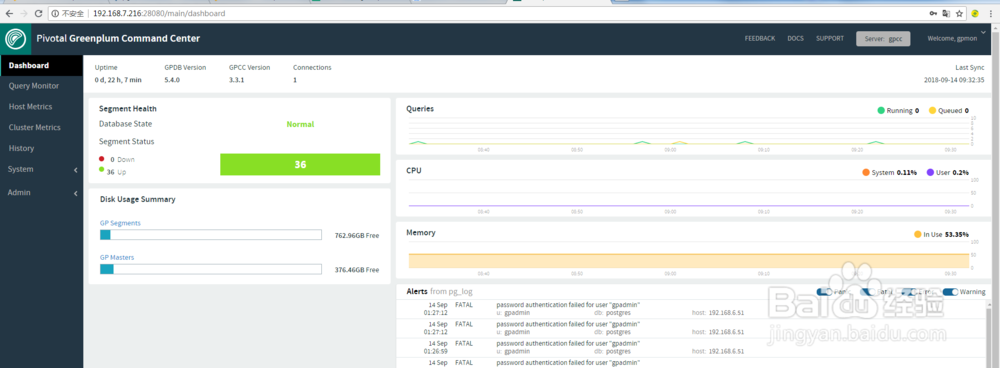
14、登录后效果如下:
15、3.9图形界面工具pgAdmin4安装
下载工具:pgadmin4-3.3-x86.exe
登录地址:http://127.0.0.1:64918/browser/
登录界面:

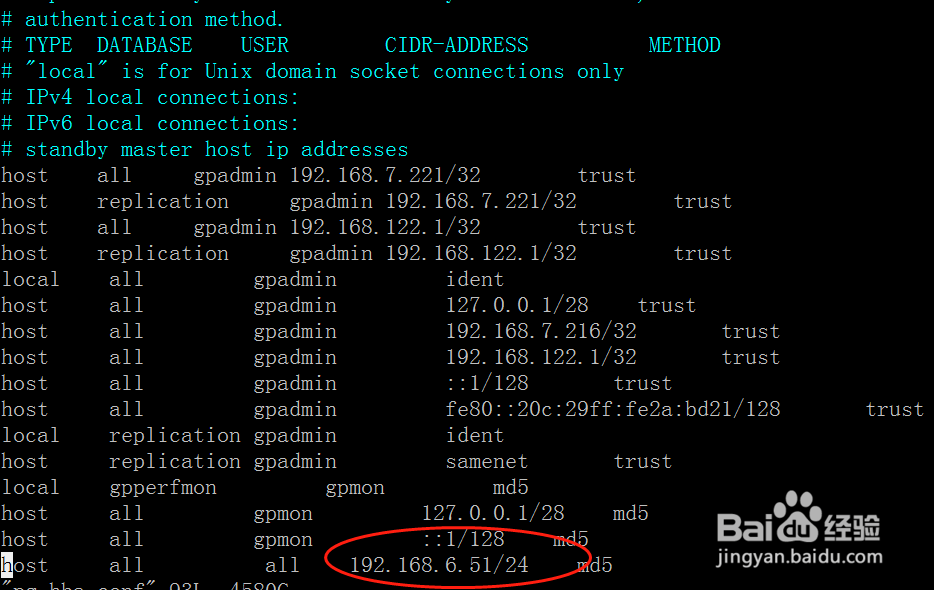
16、如果登录不成功,一般报错如下样子:
psql: FATAL: no pg_hba.conf entry for host "192.168.xxx.xxx",
表示访问权限不够
修改文件/home/gpadmin/gpdata/master/gpseg-1/pg_hba.conf
17、最后登录成功如下:
